Behavior Driven Development with Nightwatch.js and Cucumber.js
Whether you are a test automation engineer proficient in Ruby, Python or Java, or a manual QA engineer with little to no programming experience, the task of implementing an automation framework using JavaScript, a powerful but complex asynchronious programming language, can be very intimidating. As full-stack Node.js applications are exploding in popularity, the importance of being able to implement test automation frameworks using JavaScript is increasing as the use of the language across the whole stack is becoming the norm. Fortunately, for testers ranging from having zero programming skills to those who are proficient in building automation frameworks using synchronious languages who either don’t have the time or are intimidated by the notion of having to deal with intuitively complex features such as callbacks, promises, and closures that make JavaScript such a complex but powerful language, there is a solution: Cucumber.
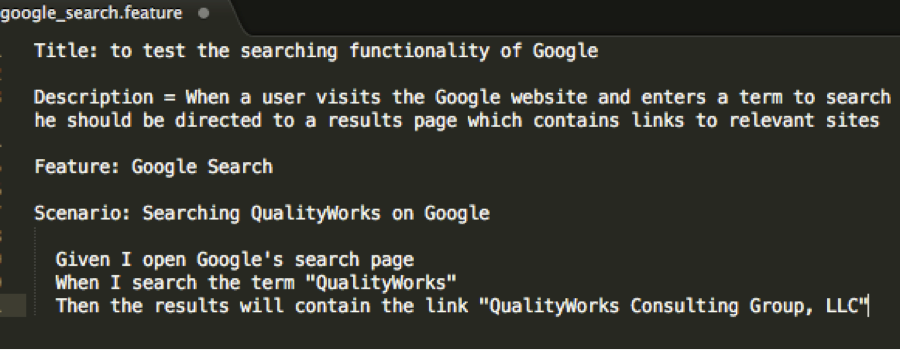
Cucumber is a testing tool that executes plain text functional descriptions as automated tests. The test cases are written in simple, plain English. To illustrate the tester-friendly nature of Cucumber, while explaining its functionality along the way, we will work through the implementation of a feature encountered often by many – searching a term on Google. We start by creating a folder called ‘features’ in the base directory of your project (usually in the ‘app’ folder). Inside this features folder we need to create files for each feature, with a title of the feature as the prefix and ‘.feature’ as the suffix. For example, if we have a searching Google feature we want to test we create a file called ‘google_search.feature’. Each feature file contains a title, a description, the feature name, and a scenario. A scenario is made up of the steps you need to take to implement the feature. The title, description, and feature sections are written in plain English, but the steps of a scenario are written using the Gherkin language. Gherkin scripts are made up of three keywords: Given, When, Then. The following is an example of what the google_search.feature should look like:

Note that Feature: and Scenario: are keywords. They need to be capitalized and include a colon at the end. Every .feature file needs to have a Feature: defined and a Scenario: defined. Note that the Title: and Description: sections are optional and you can have multiple scenarios for each feature. Also note that any data is in double quotes! In our feature, “QualityWorks” is the data value we will use. Other examples of data could be a username and password required to login to a site; these must be surrounded by double quotes in Cucumber scenarios. The next step is to actually implement the steps of the feature. This is where JavaScript functional/browser (end-to-end) testing tools, such as Nightwatch.js come in.
Nightwatch.js is an automated testing framework written in Node.js that utilizes the Selenium Webdriver Api, specifically the WebDriver Wire Protocol, to carry out browser related tasks. Essentially, this ‘automation’ tool allows a computer to mimic a user’s interaction with a web browser through simple, intuitive commands (such as .url() and .click() which navigate to a site and click a button/link, respectively). Like most other automation tools, Nightwatch.js uses CSS and Xpath selectors to manipulate web elements. Besides being a powerful test automation framework, Nightwatch.js stands out from most other Node.js based frameworks due to its third-party integration with Cucumber. This means that you can use a Cucumber.js plugin for Nightwatch.js that enables the tester to use a Behavior Driven Development (BDD)-style approach for browser testing. This means that you can describe user scenarios/test-cases using the Gherkin syntax (plain English) with Cucumber and map them to browser commands/operations and assertions provided by Nightwatch.js.
With this information in mind, let’s return to our Google Search example. After having described scenario steps using Cucumber in the google_search.feature file inside our features folder, we now need to “define these steps”. This means that we need to perform a technical implementation of these steps so that the browser knows what operations and assertions to carry out. Using step definition files we will actually be translating the scenario steps written in Gherkin/English into a language the computer can use to carry out those steps in the browser. These step definition files are JavaScript files (use the same prefix as their corresponding feature file followed by a .js suffix – google_search.js) that use the Nightwatch.js commands and assertions to perform the operations described by each Given, When, Then feature steps in the browser. We first need to create a “step_definitions” folder inside our features directory. This folder will store our step definition files. Inside the step_definitions folder we need to create a JavaScript (.js) file that is named after the feature (google_search.feature) we are testing (in this case google_search.js). Inside this file we will be implementing the scenario steps we wrote with gherkin on the login.feature file.
There is a neat, time-saving trick Cucumber provides so that we can get started with implementing our step definitions. After installing Nightwatch.js and configuring it to use the Cucumber.js plugin – details on how to install and configure both can be found in the last section of this article – use your terminal to navigate to the directory that contains your ‘features’ folder and run/execute the test/feature using the following command: node_modules/.bin/nightwatch . This is what will be outputted in your terminal as a result:

By executing the test/feature before implementing its corresponding step definitions we can take advantage of Cucumber translating the Given, When, Then statements from our feature file into JavaScript code, more specifically JavaScript functions, that will encapsulate our Nightwatch.js commands and assertions. Go ahead and copy the snippets from your terminal into your google_search.js step definitions file:

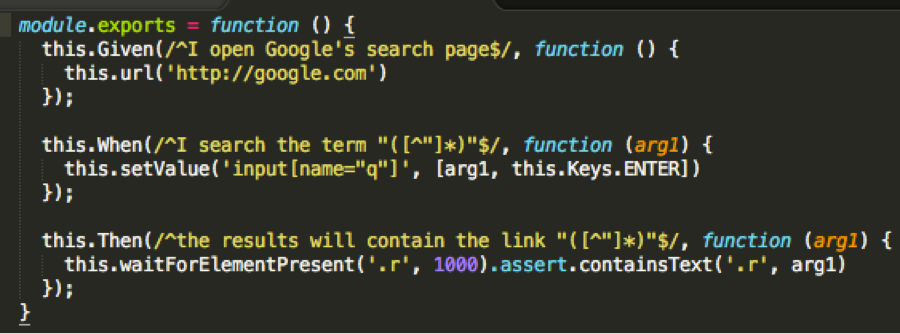
After having done this, notice three things: 1) There is a Given, When and Then function that matches word for word what we wrote for our scenario in our corresponding feature file except our double-quoted data (ex: “QualityWorks” and “QualityWorks Consulting Group, LLC”) which have been replaced with: “([^”]*)” - a JavaScript regular expression that represents a string (ex: “QualityWorks”). The argument (arg1), which represents the value of the data string we specified in our scenario, is passed into the function so that our Nightwatch.js commands and assertions have access to it. 2) Each function contains a return ‘pending’; JavaScript command which we will replace with the Nightwatch.js commands. 3) the functions are encapsulated within the module.exports = function () { … } function so that the code can be utilized in other files (in this case, by its corresponding feature file).
After having completed these steps the tester is in the position to actually use the Nightwatch.js commands and assertions to turn the phrases into concrete actions the computer can perform on the browser to carry out the scenario. If you are unfamiliar with Nightwatch.js commands and assertions I recommend that you read the official user-guide found here http://nightwatchjs.org/guide#usage as a tutorial on its use is beyond the scope of this article. Nevertheless, the caption below illustrates the “defined” steps of the scenario using the Nightwatch.js commands and assertions:

Now that we have defined the step definitions for our scenario, we can run our test. Navigate to the directory that contains your features file and run the same command as before which executes the test: node_modules/.bin/nightwatch

As you can see, the test successfully passed (denoted by all green lines) which means that the computer was able to successfully navigate to Google, enter a term into the search bar, and receive relevant results! This means that our feature was executed successfully so the tester should feel confident that this feature would not break in the wild. Now that we have the basics down, we will focus on advanced features of Cucumber.js that will make your tests more scalable and maintainable: multiple scenarios and parameterization.
One of the powerful aspects of Cucumber.js is the ability to reuse the functions implemented in the step_definitions files for multiple scenarios of the same feature. For example, assume that we want to test multiple scenarios for the Google Search feature. Namely, we would like to search two terms using two distinct scenarios. The first scenario, from our original example, will search ‘QualityWorks’ while our second scenario will search ‘NodeQa’. Cucumber.js allows us to define two or more scenarios for the same feature while allowing us to reuse functions defined in the corresponding step_definitions file is any of the Given, When, Then statements happen to belong to both scenarios. This comes in handy as it allows the tester to adhere to the ‘DRY’ principle (Don’t Repeat Yourself) by not having to create duplicate functions with the same behavior. This is beneficial in the long term as code-changes will only need to be implemented in one function should the functionality of the feature change in the future, thus making the tests more scalable and maintainable. Below you can see an example of our Google Search features file that now contains two scenarios and its corresponding step_definitions file. Note that even though we added an extra scenario, we did not need to add any code to the step_definitions file as the functions within it are reused by the scenarios – since the Given, When, Then steps in the two scenarios are identical except for the data (double-quoted) which is passed in to the function:


When we run these tests (by typing node_modules/.bin/nightwatch) we can see that they were executed successfully:

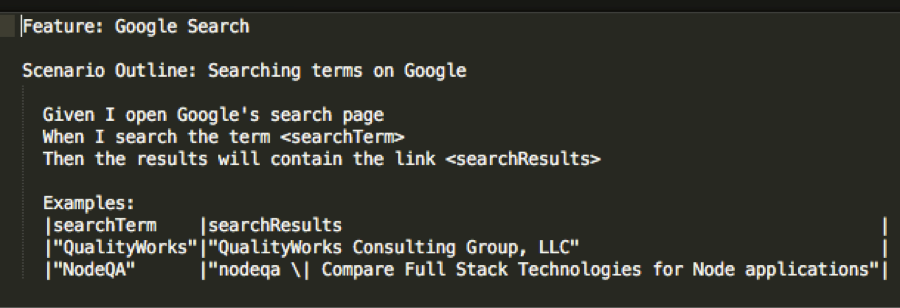
So, we have now witnessed one of the more powerful features of Cucumber.js which allows us to avoid code duplication which means less work, more maintainability, and scalability in the long term. A more advanced feature of Cucumber.js that allows the tester to remove duplication, or ‘DRY up’ their tests, even more is the use of Scenario Outlines with Example Tables for parameterization. This functionality allows the tester to avoid having to duplicate code not only on their step_definitions files but also in their feature files. Essentially, scenario outlines make the scenarios in each feature “dynamic” so that instead of having to describe two (or more) scenarios with the exact same Given, When, Then steps except for the data value passed in, the tester can just have one scenario outline that is passed in multiple data values stored in an examples table. This is similar to the concept of using loops in programming where we iterate through the same code multiple times while passing in different values for the same variable. To best illustrate how scenario outlines are used we will restructure our feature file which contained two scenarios composed of the same steps but that each contain a different data value into a feature file which contains only one scenario outline and an accompanying examples table which stores the data values that will be passed in. Note that the double quotes used to represent a data value are now replaced by less than ‘<’ and greater than ‘>’ symbols around a variable which now represents the data values that will be passed in by the examples table. The data values for each variable are stored in the subsequent rows of the same column as the data variable:

When we execute this test we can see that we obtain the same results as if we had defined two scenarios like we did in our previous example

However, by using a scenario outline we have removed duplication from our feature file which makes our tests more scalable in the long run and saves time and effort. If the tester needs to search for an additional term on google in the future, they can accomplish so by just adding an additional row to the examples table with the search term and search results instead of having to define an additional feature.
This concludes our tutorial which I hope provided you, the tester, QA Manager, or even CTO, with a solid foundation of test automation using BDD frameworks such as Cucumber with the Nightwatch.js Node.js library that you can then build upon. I am also hopeful that this article provided a strong argument for using the Nightwatch.js and its Cucumber.js plugin by QA teams who work on full-stack Node.js applications but who may not have the time or programming skills to implement the Nightwatch.js tools with JavaScript.
As promised, this last section will hopefully provide the reader with guidance on how to install and configure Nightwatch.js and its Cucumber plugin into their app. There is an official nightwatch-cucumber repository that contains instructions on how to set up the two frameworks in your local environment. Personally, I found these instructions to be very straightforward but incomplete as I was not able to setup the frameworks in my app successfully by just following these steps while trying to fill in the gaps by reading the official Nightwatch.js documentation. Luckily, I was able to find another repository that provides a step-by-step guide on how to successfully install and configure Nightwatchjs. Since the latter did not contain instructions on how to configure the Cucumber.js plugin, I combined the instructions from the two repos and was able to get my tests to successfully run in my local environment. Note, only follow these steps if you cannot successfully install the two frameworks using the instructions provided here.
- Clone the learn-nightwatch repo by copying and pasting the following command into your terminal: git clone https://github.com/dwyl/learn-nightwatch.git && cd learn-nightwatch && cp sample.env .env
- After executing the previous command, you will now be inside the learn-nightwatch parent folder in your terminal. In this directory (learn-nightwatch), Install the required dependencies using the following command: npm install
- In the same directory, you need the nightwatch-cucumber library to be installed locally using the following command: npm install --save-dev nightwatch-cucumber
- in the same directory, you need to install the Cucumber.js framework locally: npm install –-save-dev cucumber
- In your current directory, delete the nightwatch.conf.Basic.js file and replace all of the contents in the nightwatch.conf.js file with the contents in this file. The major change in the configuration file is that the src_folders property is now set to nightwatch-cucumber which represents the required ‘nightwatch-cucumber' library
- Lastly, in the same directory (learn-nightwatch) delete the test folder. Now, create a features folder in the current directory and start writing your features and step-definitions. Remember that for the tests to run successfully you need to run the node_modules/.bin/nightwatch from the directory that contains the features folder.
